


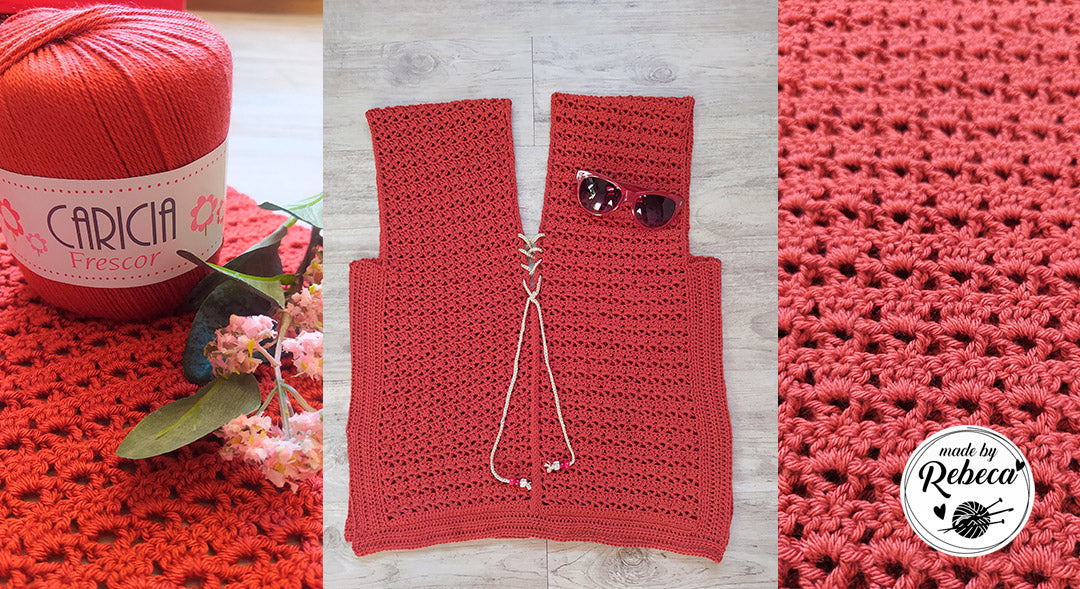
Top Summer Breeze with Coolness
Summer is very, very close and we are already preparing for it with the help of our collaborator Rebeca Marín (@madebyRebeca) and our quality Caricia Frescor. We are going to design the most ideal top of the season in the most vibrant colors. Are you in? Let's get to work!
YOU WILL NEED:
8 balls of Caricia Frescor yarn, color Caldera - nº 265 Remaining Caricia Frescor yarn of the other color Crochet hook size 4 Yarn needle Measuring tape Scissors Stitch markers (optional) 6 Decorative beads (optional)

You can purchase the materials through the links to our online store that appear above in the list.
HOW TO MAKE THIS TOP?
Stitches used
Chain stitch – ch. Double crochet – dc. Slip stitch – sl st. Single crochet – sc. Half double crochet – hdc.
Before you start
*To make this top, you need to knit 2 identical pieces that, when folded in half, will serve as the front and back. (See drawing on page 3) *This fancy stitch, the "V" stitch, is made with a chain multiple of 2. *You can use markers to know where to make the starting and ending stitches of each row. This will ensure you are knitting all the stitches. *It is important to make a swatch of the stitch used (see chart on page 7) to calculate the stitches and rows you need to make to adapt it to yourself. *For the top to fit perfectly, I preferred that you make your own calculations, rather than providing a standard size chart. Each of us is unique and different, and it's best to adapt it to our own body. In the next section, you will see what measurements you need. NOTE: If you use different yarn to knit this top, the result may vary. To make it perfect, knit a swatch with the fiber you use.
How to calculate measurements to knit your size:
The top I knitted for my size measures 50 cm wide and 60 cm long. In this box, you can write down your measurements to make the necessary calculations to adapt it to you.
|
From these measurements, choose the largest. If it's number 1, divide the centimeters by two to get the width of each piece. If it's number 2 or 3, divide the centimeters by 4. This will give you the correct measurements. The measurements you see in the drawing are what I need to make size L. They serve as a reference to guide you. Now, knit a swatch of 20 stitches by 9 rows in the openwork stitch to make your calculations. My swatch of 20 stitches by 9 rows measures 9.5 cm wide and 9 cm high. Measure your swatch and put the data here: _____ cm wide by ____ cm long. With this, you will do the calculations below. Now you have to do a rule of three to find out how many stitches and how many rows you need to make the top fit you. I have made these calculations with my measurements. Substitute the bold numbers with your measurements: If 20 stitches are 9 cm (swatch), how many stitches are 20 cm (the width I need for each piece)? 20 st = 9.5 cm x = 20* 20 / 9.5 X st = 20 cm. x = 42 stitches / chains I need to start my piece If 9 rows are 9 cm (swatch), how many rows do I need to make to reach 108 cm (total length of the piece)? 9 r. = 9 cm x = 9 * 108 / 9 X r = 108 cm. x = 108 rows I need to knit in total
Step by step
We are going to make 2 identical pieces, of 42 stitches and 108 rows to form the body of the top.
- Start with a chain of 42
- Row 1: Chain 3. Make 1 dc in each of the chains you have, until the end of the row.
- Row 2: Chain 3, *skip two stitches, in the 3rd make 1 dc, 2 ch, 1 dc in the same stitch*. And repeat what is between *. To finish, make 1 dc in the 3rd ch from the beginning of the previous row.
- Row 3: Chain 3. *In the chain space of row two, make 3 dc* And repeat what is between *. To finish, make 1 dc in the 3rd ch from the beginning of the previous row.
- Rows 4 to 107: Repeat rows 2 and 3 until the end.
Note: In even rows, the "V" stitch, you have to make it in the 2nd dc of the group of 3, that you made in odd rows.
- Row 108: Chain 3 and make 1 dc in each space between the "V" stitches and 2 dc inside. You must finish the row with 42 stitches.
Now you need to make a row of single crochet around your pieces. On the sides, you crochet two sc in each of the spaces created when making the turning chains of each row. Once the two pieces are crocheted, you will join them. To do this, fold them in half and place them next to each other. Then join the central part in the front and back with a slip stitch. Insert the hook into the inner part of the stitch, from one side and the other, and make a sl st. I sewed 28 cm in the front and 26 cm in the back, so that the back is a little more exposed. These measurements will depend on how open you want the neckline and the back to be. You can adapt them to your liking. If you like the top to be fitted, you could now sew the sides directly. Before sewing the sides, I added some hdc pieces on both sides of each strip. I crocheted directly over the sc of the side. I made 65 hdc and 6 rows, and they measure 4 cm wide and 36 cm long. This way, I was able to adjust the top to my body. Once the 4 parts are finished (2 on each side of the top), I joined them in the center. I sewed, with an invisible seam, 28 cm and left an opening of 14 cm. To finish the top, I made a bottom border in hdc in the front and back, to make it longer. I crocheted 90 stitches and 4 rows. This border measures 2 cm wide and 50 cm long. With this border, my armhole measures 38 cm in total. Now let's add a special touch. Make a chain of about 250 stitches (110 cm), add the beads at the ends and pass it through the "buttonholes" of the top's neckline.
FINAL RESULT:


%20and%20our%20quality%20Caricia%20Frescor.%20We%20are%20going%20to%20design%20the%20most%20ideal%20...)