Do you fancy making a beautiful outfit for your favorite "doll" with your own hands? You'll knit this pinafore dress and hat using yarn and cute buttons. This is an ideal project for experienced knitting enthusiasts.
YOU WILL NEED:
 For a 36-month size.
- Caricia Batik Joven yarn, color Nº 29, 4 balls.
- Knitting needles nº 4.
- 4 fancy buttons.
- Stitch holder.
- Tapestry needle.
Get your materials now
GAUGE:
In stockinette stitch: 10 x 10 cm = 20 sts and 28 rows.
STITCHES USED:
HOW TO MAKE THE PINAFORE DRESS?
Front:

We start with the front, casting on 90 sts with Caricia Batik yarn. We knit 6 rows in garter stitch. From now on, we continue knitting in stockinette stitch for 14 rows.
Next, follow this pattern to begin decreasing: starting from the 16th row, decrease by knitting 2 sts together on both sides, every 6 rows, 9 times. You should obtain a length of 32 cm from the beginning. We have decreased a total of 18 sts.
It's time to decrease 12 stitches in the same row, distributing them alternately as follows: *make 4 stitches and knit the next 2 sts together in stockinette stitch*, repeat until the end of the row. This way we get 72 sts.
Work 4 rows without decreasing.
Armhole
We begin to make the armhole. To do this, we will decrease as follows: On the right side of the work, cast off 3 stitches once on both sides of the work (3 stitches on the right side, at the beginning of the row, and 3 stitches on the next wrong side row).
Next, cast off 2 stitches once on both sides.
Then, cast off 1 stitch twice on both sides.
Work 4 rows without decreasing. Cast off 1 stitch and continue without decreases.
Neckline
We move on to the neckline, which we will begin 12 cm from the armhole:
On the right side of the work, cast off 8 central stitches and continue each side separately, reserving the remaining stitches on a stitch holder and decreasing as follows: in each row, cast off 4 stitches once, 3 stitches once, 2 stitches once, and 1 stitch twice. Cast off the remaining stitches to form the shoulder.
Now we have to pick up the stitches we left on hold and repeat the same procedure for the other side of the front, but decreasing on the wrong side of the work.
Back

We begin with the back. We will work the same as the front up to the armholes, but making a central opening that is worked as follows:
Back opening
At 32 cm in length from the beginning of the work and on the right side, cast off 2 central stitches (1 st and 1 st) and continue separately until reaching the neckline, reserving the rest of the stitches on a stitch holder. We must work the armhole simultaneously, just like on the front.
Neckline
We make the neckline at 15 cm in length from the opening and on the right side of the work. In subsequent rows, cast off 4 stitches once; then cast off 3 stitches twice and 2 stitches once. Cast off the remaining stitches.
Next, pick up the stitches on hold and repeat the steps, but decreasing the neckline stitches on the wrong side of the work.
HOW DO WE MAKE THE HAT?
 Cast on 84 stitches and work in fancy stitch for the first 46 rows, increasing in the rows worked in stockinette stitch three times, 2 stitches on each side, obtaining 96 stitches.
Work 10 rows without increases. Increase in the next row *1 st every 11 stitches*, repeat until the end of the row. Work 12 rows without increases and continue increasing in this way: *Increase 1 st every 6 sts*, repeat until the end of the row.
From now on, we decrease:
In the successive rows, decrease as follows: *cast off 1 st (knit 2 sts together) every 7 sts* repeat until the end; in the next row, *cast off 1 st every 6 sts*, repeat until the end; in the next row, *cast off 1 st every 5*, repeat until the end; in the next *cast off 1 st every 4*, repeat until the end; in the next *cast off 1 st every 3*, repeat until the end of the row; in the next *cast off 1 st every 2*; in the next *work 1 st and cast off the next*, repeat. The remaining stitches are cast off by working as follows: *2 sts together in stockinette stitch*, repeat until the end of the row.
With a tapestry needle and a strand of yarn, close the remaining stitches, forming a small circle, and fasten off the work.
Sew both ends of the hat (see video: sew seams).
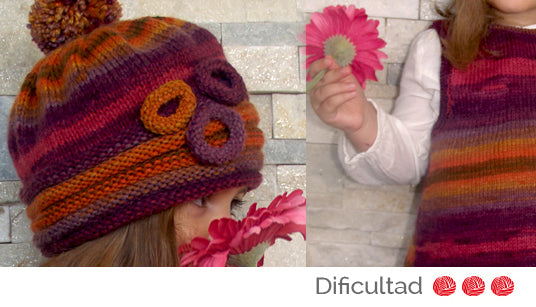
Pom-pom
Let's make the pom-pom.
Cut a 7 cm diameter cardboard circle and make a hole in the center.

Now, we put a thread with a pass in the center that will serve to tie and secure our pom-pom.

Now, we start threading the yarn (several passes), with the needle until the cardboard is almost completely covered; the more passes, the more volume it will have.

With scissors, cut the yarn around the cardboard circle.
Next, carefully cut the cardboard, separate it from the yarn, and discard.
 Hold the central thread, pull firmly but carefully, and wrap it around the bundle, tying it securely.

Trim to even out and sew to the hat, taking a few stitches on the inside of the work.

Now, the hoop-shaped embellishments for the hat.

We're going to make three. Cast on 20 sts, and work 8 rows in reverse stockinette stitch. Cast off the stitches and join the ends. Sew the 3 embellishments on the front-side front, as you can see in the photo.
ASSEMBLY AND FINISHING
All that's left is to finish the work.
Shoulder and neckline finishing

Work armhole and neckline finishing.
Sew the shoulders. With the knitting needle, pick up the stitches around the armhole, and work 6 rows in garter stitch, cast off, and fasten off the work. Do the same for the other armhole.
Work the front and back necklines the same way, picking up the stitches one by one with the needle; work 4 rows in garter stitch and cast off.
Buttonholes
In the back opening, work one side first, then the other, separately. Make the buttonholes on the right side of the work. Work as follows:
- 3rd row: *make 3 knit stitches and cast off 1 stitch*, *work 8 knit stitches, cast off 1 stitch* * work 8 knit stitches, cast off 1 stitch* * work 8 knit stitches, cast off 1 stitch*. Continue in knit stitch until the end of the row.
- 4th row: when you reach the point where you decreased 1 stitch, and in each buttonhole you made, make a yarn over (this way, you recover the stitch you cast off) and continue working until the end of the row. Work the next 2 rows as usual. Cast off and fasten off (see tutorial: buttonholes)
Sewing the body
Sew the front to the back.

Finishing
Sew the buttons on the other placket and fasten.

And here's the result...


It turned out beautiful, didn't it? The effort was worth it. With this cute outfit, your little girl will be the chicest in the park.


