


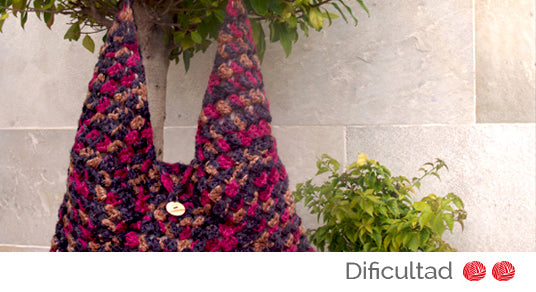
If you like to create your own accessories, you'll love this project. With a crochet hook and good quality yarn, you can get to work on this bag that includes granny rosettes.
YOU WILL NEED:

- Caricia Siberia yarn color 775, 5 skeins.
- Crochet hook size 6 mm.
- Tapestry needle.
- Wooden button.
- Printed cotton patchwork fabric.
GAUGE:
In dc: 10 cm x 10 cm = 12 sts and 6 rows.
STITCHES USED:
- Chain stitch (ch)
- Single crochet (sc)
- Double crochet (dc)
HOW TO MAKE OUR BAG?
Granny Rosette
Let's start with the rosette...

With a 6 mm crochet hook and Caricia Siberia yarn, make 6 chains and close with 1 slip stitch to form a ring.

Row 1: Make 3 chains and 11 double crochet stitches. For this project, always insert the hook under the chain.

Row 2: Always start with 3 chains (equivalent to 1 dc) and make 1 dc in the same chain where you made the 3 chains. (You will have 2 dc in the same stitch). Continue working as follows: *2 chains, 2 dc in the same stitch*. Repeat until the end of the row.
Row 4: Make 3 chains, 2 dc in the same chain, and make 1 chain. Continue working as follows: *3 dc in the same stitch and 1 chain*. Repeat until the end of the row.

Corners
We continue forming the corners:
Row 5: Start with 3 chains and 2 dc in the same stitch, make 3 chains and 3 dc in the same stitch. Continue as follows: *1 chain and 3 dc in the same stitch, 1 chain and 3 dc in the same stitch, 1 chain and 3 dc in the same stitch, 3 chains and 3 dc in the same stitch.* Continue the row, repeating this pattern until you form the 4 corners.
In successive rows, continue working according to the previous pattern, gradually increasing in each row.
When you have completed 10 rows from the beginning, fasten off. You will have a 47 x 47 cm square.
You need to make three rosettes.
Handle

To make the handle, cast on 6 chains and work in double crochet. When you have a length of 45 cm, fasten off.
Rosette for the flap

Row 1: make 6 chains, and close with 1 slip stitch, forming the circle. Work 12 single crochet stitches. From now on we increase as follows:
Row 2: make 3 chains and crochet *1 double crochet and 2 double crochet in the next chain.* Repeat until the end of the row. (18 stitches)
Row 3: make 3 chains and work: *2 double crochet and 2 double crochet in the next chain*. Repeat until the end of the row. (24 stitches)
Row 4: 3 chains and crochet: *3 double crochet and 3 double crochet in the same chain.* Repeat until the end of the row. Make 10 chains and fasten off, leaving a strand to sew the flap to form a buttonhole.
ASSEMBLY AND FINISHING

Sewing the rosettes
To join the rosettes, first sew one square to another along one of its sides, always on the right side of the work (see tutorial: sewing seams). Sew the third rosette as shown in the photo. Fold each rosette in half and finish sewing the remaining side.
Sew the handle to the bag.
Lining

Fold the fabric, facing it, cut 2 identical pieces, following the bag pattern. The measurements are: 47 cm wide x 47 cm long, draw the V shape for the opening, cut out.
Cut a pocket 19 cm x 14 cm. Hem and sew to one of the lining sides.
Machine sew both parts of the pattern. Insert the lining inside the bag, right side in, hem the top and hand-sew with embroidery floss in a color that matches the fabric.
Attach the flap to the bag, in the center of the V shape, sew the button with the tapestry needle and fasten it.

Do you like how it turned out? We have chosen colors that combine very well with all the autumnal tones, but you can choose the ones you like best. Dare to make your own and show off your bag in front of your friends. You can also give it to your daughter! She will love it!