


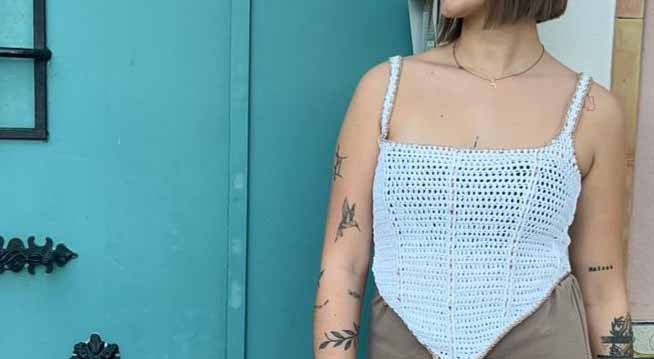
Sparkle corset top pattern
Today we will show you how to crochet a corset top designed by @saraswasti_crochet. You will only need 4 balls of Caricia Destellos and to follow the step-by-step instructions below.
What materials do you need to crochet this corset top pattern?
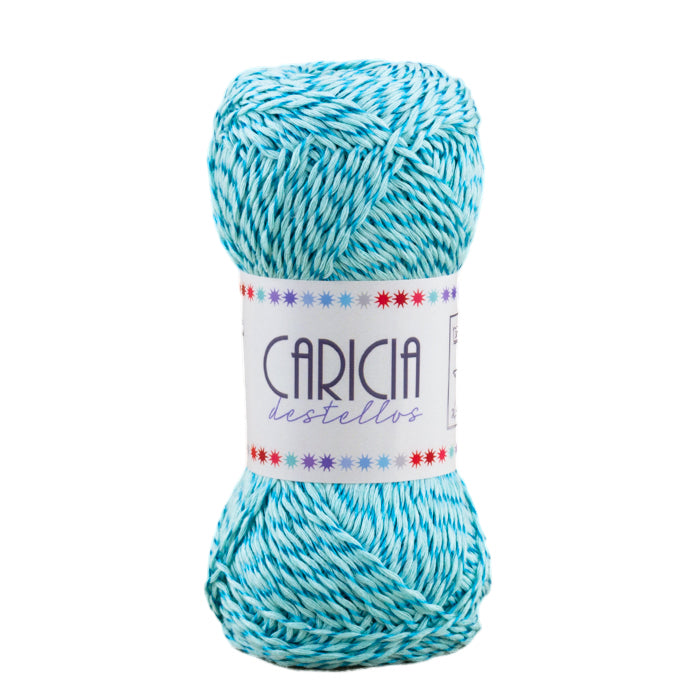
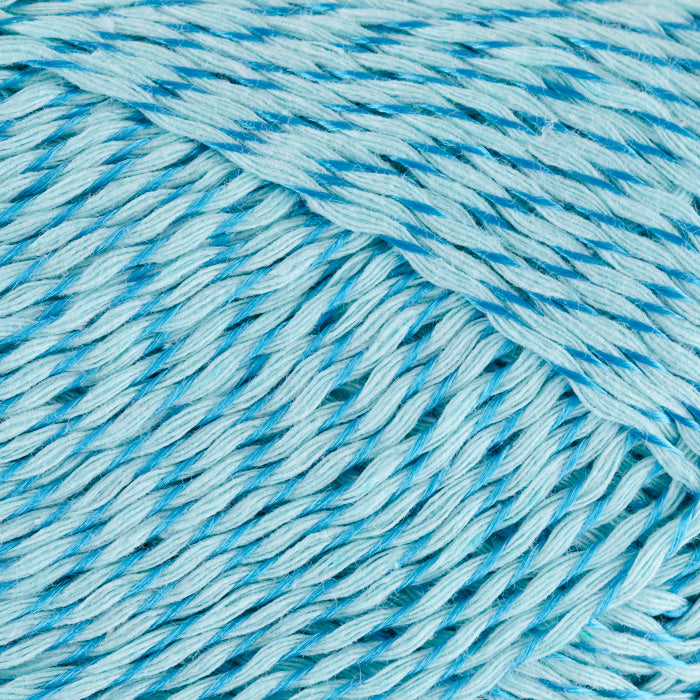
- 3 balls of Caricia Destellos in white. Color 101.
- 1 ball of Caricia Destellos in gold. Color 102.
- 2.5 mm crochet hook.
- 2 stitch markers.
- 2 meters of 5 mm ribbon in the desired color.
- Sewing needle and thread.
- Tapestry needle.

What stitches will we use in this pattern?
- Ch: Chain.
- Dc: Double crochet.
- Sc: Single crochet.
- FPdc: Front Post double crochet: Work 1 dc around the dc of the previous row, inserting the hook from front to back.
- BPdc: Back Post double crochet: Work 1 dc around the dc of the previous row, inserting the hook from back to front.
Pattern
Front:
This top is crocheted from bottom to top. The first rows are the same for all sizes; I crocheted a size M/L.
Start with 8 ch. This number is the same for all sizes.
Row 1: 3 ch (counts as first dc) + 7 dc. You will have 8 dc in total.
Row 2: 3 ch (counts as first dc) + 2 dc in the same stitch (increase) + 2 dc + 2 FPdc + 2 dc + 3 dc in the same stitch. You will now have 12 dc.
Row 3: 3 ch (counts as first dc) + 2 dc in the same stitch (increase) + 4 dc + 2 BPdc + 4 dc + 3 dc in the same stitch. You will now have 16 dc in total.
Row 4: 3 ch (counts as first dc) + 2 dc in the same stitch (increase) + 6 dc + 2 FPdc + 6 dc + 3 dc in the same stitch. You will now have 20 dc in total.
Row 5: 3 ch (counts as first dc) + 2 dc in the same stitch (increase) + 8 dc + 2 BPdc + 8 dc + 3 dc in the same stitch. You will now have 24 dc in total.
Row 6: 3 ch (counts as first dc) + 2 dc in the same stitch (increase) + 10 dc + 2 FPdc + 10 dc + 3 dc in the same stitch. You will now have 28 dc in total.
Row 7: 3 ch (counts as first dc) + 2 dc in the same stitch (increase) + 12 dc + 2 BPdc + 12 dc + 3 dc in the same stitch. You will now have 32 dc in total.
Row 8: 3 ch (counts as first dc) + 2 dc in the same stitch (increase) + 2 FPdc + 12 dc + 2 FPdc + 12 dc + 2 FPdc + 3 dc in the same stitch. You will now have 36 dc in total.
Row 9: 3 ch (counts as first dc) + 2 dc in the same stitch (increase) + 2 dc + 2 BPdc + 12 dc + 2 BPdc + 12 dc + 2 BPdc + 2 dc + 3 dc in the same stitch. You will now have 40 dc in total.
Row 10: 3 ch (counts as first dc) + 2 dc in the same stitch (increase) + 4 dc + 2 FPdc + 12 dc + 2 FPdc + 12 dc + 2 FPdc + 4 dc + 3 dc in the same stitch. You will now have 44 dc in total.
Row 11: 3 ch (counts as first dc) + 2 dc in the same stitch (increase) + 6 dc + 2 BPdc + 12 dc + 2 BPdc + 12 dc + 2 BPdc + 6 dc + 3 dc in the same stitch. You will now have 48 dc in total.
Row 12: 3 ch (counts as first dc) + 2 dc in the same stitch (increase) + 8 dc + 2 FPdc + 12 dc + 2 FPdc + 12 dc + 2 FPdc + 8 dc + 3 dc in the same stitch. You will now have 52 dc in total.
Row 13: 3 ch (counts as first dc) + 2 dc in the same stitch (increase) + 10 dc + 2 BPdc + 12 dc + 2 BPdc + 12 dc + 2 BPdc + 10 dc + 3 dc in the same stitch. You will now have 56 dc in total.
Row 14: 3 ch (counts as first dc) + 2 dc in the same stitch (increase) + 12 dc + 2 FPdc + 12 dc + 2 FPdc + 12 dc + 2 FPdc + 12 dc + 3 dc in the same stitch. You will now have 60 dc in total.
Row 15: 3 ch (counts as first dc) + 2 dc in the same stitch (increase) + 2 BPdc + 12 dc + 2 BPdc + 12 dc + 2 BPdc + 12 dc + 2 BPdc + 12 dc + 2 BPdc + 3 dc in the same stitch. You will now have 64 dc in total.
Row 16: 3 ch (counts as first dc) + 2 dc in the same stitch (increase) + 2 dc + 2 FPdc + 12 dc + 2 FPdc + 12 dc + 2 FPdc + 12 dc + 2 FPdc + 12 dc + 2 FPdc + 2 dc + 3 dc in the same stitch. You will now have 68 dc in total.
Row 17: 3 ch (counts as first dc) + 2 dc in the same stitch (increase) + 4 dc + 2 BPdc + 12 dc + 2 BPdc + 12 dc + 2 BPdc + 12 dc + 2 BPdc + 12 dc + 2 BPdc + 4 dc + 3 dc in the same stitch. You will now have 72 dc in total.
Up to this point, we have the bottom peak of the top.
From here, we will continue crocheting without increases.
Row 18: Chain 3 (counts as first dc) + 6 dc + 2 FPdc + 12 dc + 2 FPdc + 12 dc + 2 FPdc + 12 dc + 2 FPdc + 12 dc + 2 FPdc + 7 dc. You will now have 72 dc in total.
Row 19: Chain 3 (counts as first dc) + 6 dc + 2 BPdc + 12 dc + 2 BPdc + 12 dc + 2 BPdc + 12 dc + 2 BPdc + 12 dc + 2 BPdc + 7 dc. You will now have 72 dc in total.
Repeat these two rows as many times as needed to reach the desired length. In my case, I repeated it 19 times.
We now have the front.
Next, we will make the back.
Back:
We will work the back on the front piece we have already made.
Insert the hook into the bottom right side of the front and start crocheting dc along the side, making 2 dc in each space you encounter.
Continue working dc rows until you reach the desired measurement for your size. I crocheted 32 rows.
Straps:
Mark the center of the front, which will be exactly in the middle of the central rib formed by the raised stitches, and count 15 stitches on each side, placing a marker.
From there, count 8 dc and place a marker. This will be the space where we will work the base of the straps for our top.
Row 1: Take a new strand of yarn and attach it where you have the first marker. Instead of making 3 ch (which substitute for the first stitch), make 1 ch + 1 sc + 1 ch (all in the same starting stitch), continue with 7 dc. You will have 8 stitches in total.
Row 2: Chain 1 and in the next stitch make 1 sc + ch and continue with 5 dc. You will now have 6 stitches (we have decreased two).
Row 3: Chain 1 and in the next stitch make 1 sc + ch and continue with 3 dc. You will now have 4 stitches (we have decreased another two).
Row 4: 3 ch (counts as first dc) + 3 dc.
Repeat this row as many times as necessary to reach the desired length.
In my case, I repeated it 26 times.
Using a tapestry needle, join the straps to the back of the top.
Final finishing:
Work a round of single crochet around the entire top. You can do it in the same color or a contrasting color.
Weave the ribbon through the holes formed within the ribs created by the raised stitches, securing them with a few stitches using a needle and thread at the beginning and end.
And now our corset top is ready for summer evenings strolling along the beach or at festivals.


