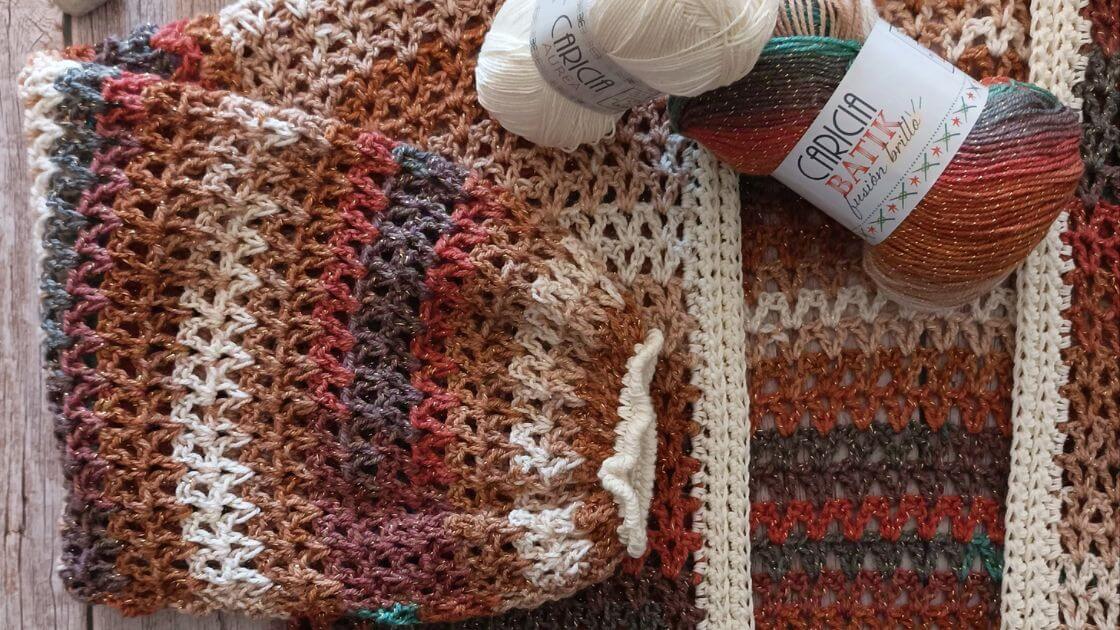
Are you in the mood to crochet something fun with spectacular results? Then you'll love this Gipsy kimono pattern designed by Isa Gardu (@saraswati_crochet). This pattern combines Caricia Batik Fusión Brillo and Caricia Aurea. The result is a bohemian and sophisticated garment you'll never want to take off.
And you know what the best part is? It's easier than you think! Isa Gardu has made sure to detail this pattern so you can crochet it yourself and have a lot of fun in the process.
What will you need?
For the swatch: 10 stitches: 10 cm in fancy stitch.
What stitches will we be working with?
- Chain stitch: ch.
- Slip half double crochet: slhdc.
- Double crochet: dc.
- Single crochet: sc.
- Crab stitch: crab st.
-
Fancy stitch:
- 3 ch, *skip 1 chain stitch and in the next one, make 1 dc + 1ch + 1 dc*, repeat from *to* until the end of the row, finishing with 1 dc in the last chain stitch of the base and 3 ch to turn.
- The next row is always worked by inserting the hook into the chain stitch that separates the dc from the previous row.
Let's begin! Step-by-step Gipsy kimono pattern

First, the back
Make a chain of 48 sc and continue crocheting in fancy stitch. As you progress with this kimono, you'll notice how the design takes shape.
When you reach a total length of 68 cm, it's time to finish this part of the work. Carefully cut the yarn and secure the ends well to ensure a clean finish.
Let's move on to the next sections of this Gipsy kimono pattern!
Next, the fronts
Make a chain of 22 sc and continue in fancy stitch.
When you reach a total length of 68 cm, cut the yarn and fasten off.
Repeat this process to crochet the two fronts, which will then be joined to the back, giving the Gipsy kimono its complete shape.
Now, the sleeves
Once the front and back parts of the kimono are finished, it's time for the sleeves.
We'll start with the shoulders, crocheting carefully to perfectly align the pieces and ensure a firm and well-proportioned structure for the kimono.
With the crochet hook, work around the armholes, covering 19 cm on each side of the shoulder in fancy stitch.
Continue crocheting until you reach a total length of 52 cm, making sure to maintain the same yarn tension so that both sleeves are symmetrical. Cut the yarn with an adequate margin and fasten off.
Let's finish the Gipsy kimono
Before continuing with the collar, cuffs, and fringe, sew the side seams and sleeve seams.
Now for the collar
Using Caricia Aurea yarn and starting from the bottom right corner, we begin by making single crochets all around the edge.
Then, following the Gipsy kimono pattern, we will make 4 rows of pmb, inserting the hook into the back loop of the V-stitch.
Continue with the cuffs
Cut the elastic to wrist size and join its ends with needle and thread.
Next, we will make sc around the cuff, inserting the elastic between the cuff and the yarn. Finish the cuff with one round of crab stitch.

Finally, the fringe
At the bottom of the Gipsy kimono, work a round with Caricia Aurea color 102 yarn following the scheme *sc + 3 ch + sc* until the end of the row, creating small arches where we will tie the fringes.
The fringes will have an approximate length of 25 cm, so the strands should measure approximately 30 cm. To achieve these measurements, follow these steps:
- Cut a piece of cardboard, the width of which will be the length of the fringes. Wrap the yarn around the cardboard lengthwise, making enough turns. In this case, you will need 12 strands per fringe.
- Cut the bundle of strands at one end and remove the cardboard.
- Insert the hook from the back of the work through one of the small arches formed by the 3 ch of the last round, taking the 12 strands folded in half. You will see a loop created. Thread the length of the fringes through it and tighten until secure.
Additional tips
For perfect fringes, the knots should be even and tight. It's also very important to trim them evenly with scissors after making them. And if you want to prevent them from unraveling, you can lightly burn the tips with a lighter.
Frequently asked questions
What level of experience do I need to crochet this kimono pattern?
This kimono pattern is designed so that anyone with basic crochet knowledge can make it without a problem. If you know how to make chain stitches, double crochets, and single crochets, you have everything you need! Plus, Isa Gardu's step-by-step instructions make the process easy and fun.
How do I prevent the kimono fringes from unraveling with use?
To ensure the fringes are well secured and don't unravel over time, it's important to make tightly tied knots and trim the ends evenly. You can also lightly burn the tips with a lighter if the yarn material allows, making sure to do so carefully to avoid damaging the garment.
What are the finished measurements of the kimono?
The Gipsy kimono design has a total length of 68 cm for the body and 52 cm for the sleeves. It is a one-size-fits-all garment with a loose fit. However, if you wish, you can modify the dimensions. To do this, increase or decrease the number of chain stitches at the beginning and adjust the length of the sleeves and body according to your preference.
Now it's your turn! Are you up for this design?
Thanks to Isa Gardu's detailed design and the quality of Caricia Batik Fusión Brillo and Caricia Aurea yarns, you'll achieve a bohemian, sophisticated result with an incredible texture.
By following this step-by-step pattern, you'll enjoy the process of crocheting while bringing a versatile garment to life. Now all that's left is for you to get started!
And if you do decide to tackle this Gipsy kimono pattern, share it on social media and tag us so we can see it!


.%20This%20pattern%20combines%20Caricia%20Batik%20Fus...)